#raspberry pi pico documentation
Explore tagged Tumblr posts
Visit Tumblr Blog
Explore Tumblr blogs with no restrictions, modern design and the best experience.
Last Seen Tumblr Blogs


Fun Fact
1,644 Tumblr posts in 1 second.
Text
PSA
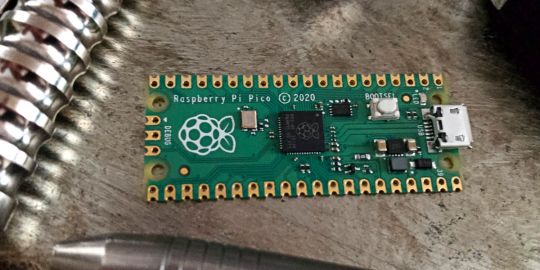
If you want to use a Raspberry Pi Pico as a debug probe to program another Raspberry Pi Pico without the annoying BOOTSEL dance, make sure that when you run CMake on the debugprobe firmware (in the picoprobe repository), you pass DEBUG_ON_PICO=ON as option. As in,
cmake -DDEBUG_ON_PICO=ON ..
This flag is described in the Readme of that repository (also note that the repository and tool have been renamed debugprobe from picoprobe), but it's notably missing from Appendix A of the Getting started with Raspberry Pi Pico guide. That guide is probably older, before the firmware was split and renamed like that, and nobody has bothered to update it yet.
If you don't do that, the firmware will expect the SWDIO and SWCLK data on different pins than what the instructions say, and you will find yourself spending hours checking the cable connections because you keep getting "Error: Failed to connect multidrop rp2040.dap0" errors in openocd. Ask me how I know.
(Also, fuck Raspberry Pi for making so much of their otherwise really good documentation PDFs. There are several places where you need to cross-reference things, and if it were HTML, the navigation between the sections would be so much easier.)
Other tip, while we're here: Install ninja (with brew install or apt install), then when doing the cmake generating step, pass "-G Ninja" in addition. Then build by just typing "ninja" instead of "make -j4" or whatever. It's a little extra typing but it is faster and better at utilising many cores on your host computer.
2 notes
·
View notes
Text
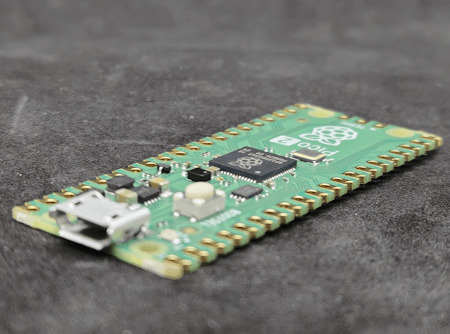
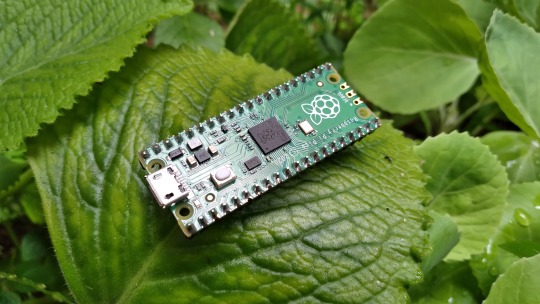
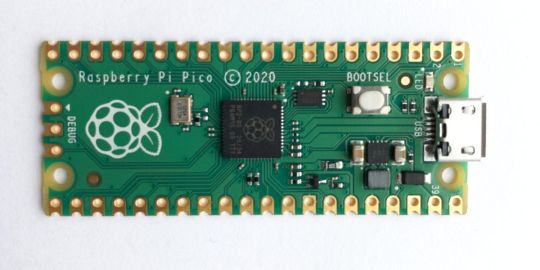
Raspberry Pi Pico W has been designed to be a low cost yet flexible development platform for RP2040, with a 2.4GHz wireless interface and the following key features:
RP2040 microcontroller with 2MB of flash memory
On-board single-band 2.4GHz wireless interfaces (802.11n)
Micro USB B port for power and data (and for reprogramming the flash)
40 pin 21mmx51mm ‘DIP’ style 1mm thick PCB with 0.1″ through-hole pins also with edge castellations
Exposes 26 multi-function 3.3V general purpose I/O (GPIO)
23 GPIO are digital-only, with three also being ADC capable
Can be surface mounted as a module
3-pin ARM serial wire debug (SWD) port
Simple yet highly flexible power supply architecture
Various options for easily powering the unit from micro USB, external supplies or batteries
High quality, low cost, high availability
Comprehensive SDK, software examples, and documentation
Dual-core Cortex M0+ at up to 133MHz
On-chip PLL allows variable core frequency
264kByte multi-bank high-performance SRAM
2 notes
·
View notes
Text
Raspberry Pi releases the Pico 2 W, a $7 wireless-enabled microcontroller board
Meet the Raspberry Pi Pico 2 W, a tiny board designed around a microcontroller that lets you build hardware projects at scale. Raspberry Pi is once again using the RP2350, its own, well-documented microcontroller. But what is a microcontroller again? As the name suggests, microcontrollers let you control other electronic components or devices. Regular Raspberry […] © 2024 TechCrunch. All rights…
0 notes
Text
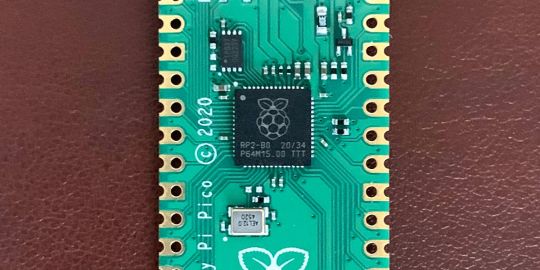
Raspberry Pi Pico 2: Maximale Leistung bei unverändertem Layout

Raspberry Pi Pico 2 - RP2350: Die Raspberry Foundation hat jetzt eine neue Version des Raspberry Pi Pico veröffentlicht. Diese erweiterte Version des ursprünglichen Pico verfügt über eine leistungsstärkere MCU. Zwar fehlen dem Mikrocontroller die Bluetooth und WiFi Schnittstelle, aber dennoch werde ich ihm eine Chance geben und ihn genauer unter die Lupe nehmen. https://youtu.be/rUWj13kCUMg Den Raspberry Pi Pico 2 habe ich mir auf der diesjährigen Maker Faire Hannover bei Berry Base für 5,5 € gekauft. Da ich diesen vor Ort gekauft habe, entfallen hier die üblichen Versandkosten und somit war es ein gutes Schnäppchen.


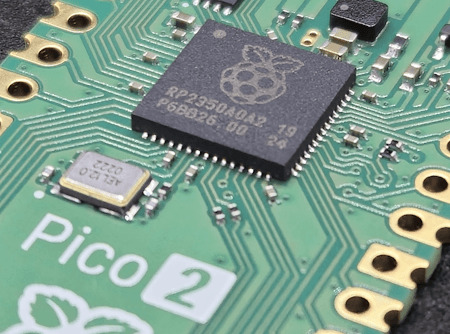
Technische Daten des Pi Pico 2 mit RP2350 MCU
Nachfolgend zunächst die technischen Daten des Pi Pico 2: Technische DatenBeschreibungProzessorenDual Arm Cortex-M33 oder Dual Hazard3 RISC-V Prozessoren @ 150MHzOn-Chip-Speicher520 KB SRAMKompatibilitätSoftware- und hardwarekompatibel mit Raspberry Pi Pico 1Schnittstellen2x UART, 2x SPI-Controller, 2x I2C-Controller, 24x PWM-Kanäle, 3x ADC-KanäleUSB1 × USB 1.1-Controller und PHY, mit Host- und GeräteunterstützungSDK und ProgrammiersprachenOpen-Source-C/C++ SDK, MicroPython CircuitPython, Arduino IDEBetriebstemperatur-20 °C bis +85 °CEingangsspannungUnterstützte Eingangsspannung: 1,8–5,5V DCAuszug aus der offiziellen Dokumentation zum Raspberry Pi Pico 2 Sicherheitsfunktionen Umfassende und vollständig dokumentierte Sicherheitsfunktionen: - ARM TrustZone für Cortex-M - Optionales Boot-Signing, durch On-Chip-Masken-ROM durchgesetzt, mit Schlüssel-Fingerprint in OTP - Geschützter OTP-Speicher für optionalen Boot-Entschlüsselungsschlüssel - Globales Bus-Filtering basierend auf Arm- oder RISC-V-Sicherheits-/Privilegienstufen - Peripheriegeräte, GPIOs und DMA-Kanäle einzeln Sicherheitsdomänen zuweisbar - Hardware-Maßnahmen gegen Fehlerinjektionsangriffe - Hardware SHA-256-Beschleuniger Unterschiede der verfügbaren Versionen zum RP2350 Es gibt insgesamt vier Versionen zu dieser neuen MCU. Unter dem Link »hier« findest du eine ausführliche Beschreibung in englischer Sprache vom Hersteller dazu. VersionInterner SpeicherGPIO-AnschlüsseAnaloge EingängeRP2350AKeiner304RP2350BKeiner488RP2354A2 MB Flash304RP2354B2 MB Flash488
Pinout der RP2350 MCU
Nachfolgend das Pinout des Raspberry Pi Pico 2. Da dieses zu 100 % mit dem Vorgängermodell kompatibel ist, wirst du hier keine Besonderheiten finden.

RPiPico2 RP2350 Pinout Die Grafik durfte ich mir mit freundlicher Genehmigung der Raspberry Pi Foundation von der Seite https://www.raspberrypi.com/documentation/microcontrollers/pico-series.html entnehmen.
Der XIAO RP2350 im Vergleich mit dem originalen Pi Pico 2
Neben dem originalen Pi Pico 2 habe ich mir den XIAO RP2350 aus China gekauft und dieser wurde recht schnell innerhalb von 5 Tagen geliefert. (Abzüglich der üblichen Probleme mit dem Zoll.) Dieser kleine Zwerg kommt mit etwas weniger Pins daher, hat jedoch den Vorteil, dass dieser zumindest über eine fortschrittliche USB-Typ-C Schnittstelle verfügt und sofort programmiert werden kann (dazu später mehr).


Dieser kleine Mikrocontroller besitzt zusätzlich eine RGB-LED, die über GPIO22 gesteuert werden kann. Zudem kann die als USER-LED bezeichnete LED über GPIO25 angesprochen werden. Die USER-LED wird ebenso verwendet, um den aktuellen Status anzuzeigen (UART Übertragung und POWER).
Einrichten und programmieren des originalen RP2350A
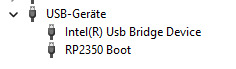
Der Mikrocontroller wird wie über die Micro-USB Buchse mit dem Computer verbunden und wird dort als RP2350 Boot erkannt.

In der Arduino IDE sowie Thonny wird dieser jedoch nicht erkannt und ich musste diesen Mikrocontroller erstmal flashen. Dazu habe ich mir die UF2-Datei von der Seite https://micropython.org/download/RPI_PICO2/ geladen und auf den Mikrocontroller kopiert. Der Mikrocontroller war dazu bereits im korrekten Modus versetzt gewesen, d.h. es war das Laufwerk RP2350 im Explorer sichtbar. Nachdem der Mikrocontroller selbständig neu gestartet ist, war dieser in Thonny einsatzbereit und man kann nun diesen mit MicroPython programmieren.

Raspberry Pi Pico 2 - RP2350 geflasht für MicroPython Nachrüsten der fehlenden Bluetoothschnittstelle mit dem seriellen HC-06 Modul Zumindest kann man die fehlende Bluetoothschnittstelle mit dem seriellen Bluetoothmodul HC-06 sehr einfach nachrüsten. Es gibt auch ESP8266 Module, welche ebenso via serieller Schnittstelle angeschlossen werden können (jedoch habe ich derzeit keines zur Hand, ist aber bestellt).
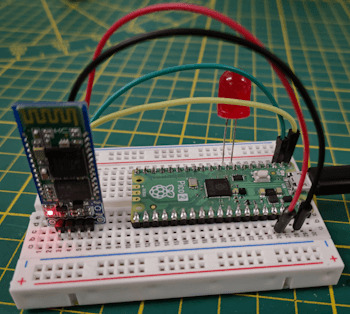
Für den Aufbau der Schaltung benötigst du: - einen Raspberry Pi Pico 2* - ein Micro-USB Datenkabel* - vier Breadboardkabel*, 10 cm - eine LED* - ein Bluetoothmodul HC-06* - ein 400 Pin Breadboard* Hinweis von mir: Die mit einem Sternchen (*) markierten Links sind Affiliate-Links. Wenn du über diese Links einkaufst, erhalte ich eine kleine Provision, die dazu beiträgt, diesen Blog zu unterstützen. Der Preis für dich bleibt dabei unverändert. Vielen Dank für deine Unterstützung! Die Schaltung hierzu ist recht einfach, für die serielle Kommunikation benötigen wir lediglich zwei Breadboardkabel und für die Stromversorgung des Modules ebenso zwei. In meinem Fall verwende ich eine 10 mm LED, welche eine Spannungsversorgung von 3.3V hat, somit direkt mit dem Mikrocontroller verbunden werden kann (quasi ohne 220 Ohm Vorwiderstand).

Schaltung - Raspberry Pi Pico mit Bluetoothmodul HC-06 & LED Im Beitrag Raspberry Pi Pico W & Bluetooth habe ich dir erläutert, wie man das Vorgängermodell mit dem CYW43438 Chip über das HC-06 Modul Bluetoothfähig macht. Der Chip CYW43438 verfügt neben WiFi auch über Bluetooth, jedoch kam dieses erst mit einem Firmwareupdate und somit gab es eine Zeit wo der Pico W ohne Bluetooth geliefert wurde. # Import der benötigten Module # zum kommunizieren über # die serielle Schnittstelle from machine import Pin, UART # definieren der seriellen Schnittstelle # der Pi Pico verfügt über mehrere serielle Schnittellen # es wird hier die erste verwendet mit # einer Geschwindigkeit von 9600 baud uart = UART(0, 9600) # die LED ist am GPIO6 angeschlossen led = Pin(6, Pin.OUT) # starten der Endlosschleife while True: # Wenn Daten empfangen wurden, dann... if uart.any() > 0: # auslesen der Daten data = uart.read() # ausgeben der Daten auf der seriellen Schnittstelle # diese können via Putty oder # in der Shell von Thonny abgelesen werden print(data) # Wenn der gelesene Wert gleich 'on' ist, dann... if "on" in data: # aktivieren der LED led.value(1) # absenden der Zeichenkette an den Sender uart.write('LED on n') elif "off" in data: # Wenn der Wert 'off' ist, dann... # LED deaktivieren led.value(0) # absenden der Zeichenkette an den Sender print('LED off n') uart.write('LED off n') Read the full article
0 notes
Text
Raspberry Pi Pico Ham Radio Transmitter — 101 Things 0.1 documentation
0 notes
Text
Raspberry Pi Pico: Vale a pena aprender?
Aprenda como usar todos os periféricos do Raspberry Pi Pico, Como instalar bibliotecas no Thonny IDE e ainda veja um comparativo do Pico/Pico W com ESP32, tudo em um único post. Mais completo que isso somente o datasheet.
O Raspberry Pi Pico desde o lançamento vem sendo muito desejado por muitos projetistas, mas será que realmente vale a pena aprender? Neste post você vai aprender tudo sobre ele. 1 Surgimento do Raspberry Pi Pico Quem acompanha a empresa Raspberry Pi, sabe que todos seus lançamentos tem um preço base para um determinado produto e o propósito disso é democratizar ao máximo o acesso aos produtos…
Ver no WordPress
#arduino nano vs raspberry pi pico#arduino raspberry pi pico i2c#arduino vs raspberry pi pico#como programar raspberry pi pico#pico raspberry pi#raspberry pi pico#raspberry pi pico adc#raspberry pi pico analog to digital#raspberry pi pico battery#raspberry pi pico datasheet#raspberry pi pico documentation#raspberry pi pico especificações#raspberry pi pico examples#raspberry pi pico pinout#thonny raspberry pi pico
1 note
·
View note
Text
Bluetooth für den Raspberry Pi Pico W
Der bliebte Microcontroller der Raspberry Pi Foundation erlaubt auch die Nutzung von Bluetooth. Jetzt gibt es mehr darüber...
Kaum ein Microcontroller steht wohl so in der Gunst der Nutzer, wie der Raspberry Pi Pico und dessen Wirelss Version Pico W. Der Pico W hat uns durch WLAN viele neue Anwendungsmöglichkeiten eröffnen. Doch was die Meißten so nicht auf dem Schirm hatten war, dass der Microcontroller von Beginn an auch über Bluetooth (BT) verfügte.
Kein Wunder, denn es gab dazu weder die nötige Software im Betriebssystem (OS/_SDK) noch Programmcode für Anwendungen, wie bspw. in Micropython. Damit liegt Bluetooth brach. Es war jedoch klar, dass sich dies ändern sollte und mit dem Update der SDK auf die Version 1.5.0, sollte sich hier etwas tun. Jetzt ist die neue Version erschienen und die ersten Beta für Bluetooths sind da.
Wir stehen jedoch im Bezug auf BT beim Pico W noch ganz am Anfang. Einige Tüfftler haben aber bereits erste Erfahrungen mit BT beim Pico W und es gibt in sofern auch bereits Code dafür. Wie das werdet ihr fragen? Die Lösung, welche das Warten auf die Onboard-BT-Funktion überbrückte war die Verwendung eines zusätzlichen BT-Modules HC-06, welches mit dem Pico W über dessen PinOuts verbunden werden konnte.
Dazu musste man vom Bluetooth Modul HC-06 den Kontakt RXD mit GP0/UART0 TX beim Pico herstellen, ferner TXD auf GP1/UART0 RX, GND auf 35(GND) und VCC auf 40/VBUS verbinden. Wenn wir von BT Verbindungen sprechen müssen wir uns auch mit dem Thema App auseinandersetze. Hier muss man nicht unbedingt eine eigene App programmieren, sondern kann ggf. sich bereits mit der Serial Bluetooth Terminal App aus dem Google PlayStore helfen.
Sicher wird es nun Anpassungen geben, die auf dem Code des HC-06 Moduls fußen und natürlich neuen Code, der im Laufe der nächsten Wochen entwickelt werden wird. Jetzt wo wir aber das Boardeigene BT des Raspberry Pi Pico nutzen können benötigen wir passende Anwendungen auf der Basis von Micropython und genau an diesem Punkt haben wir derzeit noch einen Showstopper.
Nachfolgende Links führen Dich auf Websites mit Details über BT beim PicoW und zur neuen SDK:
Doch was bringt es uns? Am Beispiel eine LED ein- und auszuschalten können wir dies beim Pico W aktuell ja sehr fein indem wir einen Webserver auf dem Pico ausführen. Jetzt könnten wir das auch über Bluetooth tun. Mhhh. Schön soweit. Steuern wir einen selbstgebauten Roboter, den wir mit einem PicoW antreiben könnte das natürlich viel nützlicher sein eine BT Verbindung dafür zu nutzen. Wir dürfen also hier ein paar neue Produkte erwarten, bei denen nun der Raspberry Pi Pico W ein wesentliches Bauteil sein wird, um beispielsweise Servos zu steuern.
0 notes
Text
Looking Forward
As we enter our last week of research, we are in the stage of finalizing our works. Last week we presented our artifact to the URCPP group and submitted a poster and an abstract for an ISAM conference. The major work is done, and now I think the important thing left to be done creating a tutorial for the project. I would love to continue working on this altar and make necessary changes, but time will not allow me. Therefore, documentation on building this altar from the ground up is essential for future references, in case there is another group that will pick up where we left and improve. In my last blog, I mentioned a couple of things that were needed to improve this altar. The main thing is that this altar needs an easy way of turning it on. I suggested that an on and off button be used to activate the altar. We are using a pico projector, which requires being charged occasionally. Because the Raspberry Pi and projector use different power sources, it was necessary to use two chargers, one for the Raspberry Pi and one for the projector. It is ideal that one cable is used to power the altar, so it would be nice if this were implemented in the future. The program could also be improved. The sensor values could be utilized better with algorithms that better calibrate the sensor values to get faster reactions. Many other things could be improved, but I’ve only stated the obvious. At this point, I have enough information to start writing my capstone paper. I have chosen the topic of slow technology and spirituality. Slow technology interests me, and the altar we created was influenced by spirituality, so I thought it was a good idea to choose this combination.
0 notes
Text
Playing sounds from the Raspberry Pi Pico using CircuitPython - a journey of discovery
As you probably know by now, I’m not a microcontroller expert. However, with the advent of microcontrollers that use MicroPython and CircuitPython, I am a lot more comfortable using them now than I used to be! However, because the Raspberry Pi Pico is new, there aren’t a lot of practical examples of how to do things out there. There is excellent documentation, of course, but when you’re trying to…

View On WordPress
0 notes
Text
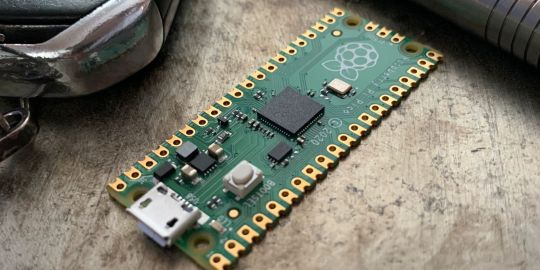
A Peek at the Pico, Raspberry Pi's Newest Petite Powerhouse
Raspberry Pi Pico
8.80 / 10
Read Reviews
Read More Reviews
Read More Reviews
Read More Reviews
Read More Reviews
Read More Reviews


Shop Now
Meet the new Raspberry Pi Pico; a tiny microcontroller filled with big possibilities.
Specifications
Brand: Raspberry Pi
CPU: Dual-core 133Mhz ARM
Memory: 264Kb
Ports: microUSB
Pros
Powerful ARM Processor
Micro-USB Connectivity
Breadboard Mountable
Easy-To-Use Interface
Absolutely Adorable
Inexpensive
Cons
No Wi-Fi or Bluetooth connectivity
No Header Pins
I/O Port Labelling on One Side Only
No USB-C Connectivity
Buy This Product
Raspberry Pi Pico other
Shop
// Bottom var galleryThumbs1 = new Swiper('.gallery-thumbs-1', { spaceBetween: 10, slidesPerView: 10, freeMode: true, watchSlidesVisibility: true, watchSlidesProgress: true, centerInsufficientSlides: true, allowTouchMove: false, preventClicks: false, breakpoints: { 1024: { slidesPerView: 6, } }, }); // Top var galleryTop1 = new Swiper('.gallery-top-1', { spaceBetween: 10, allowTouchMove: false, loop: true, preventClicks: false, breakpoints: { 1024: { allowTouchMove: true, } }, navigation: { nextEl: '.swiper-button-next', prevEl: '.swiper-button-prev', }, thumbs: { swiper: galleryThumbs1 } });
We’ve managed to get our hands on the coveted Raspberry Pi Pico. Today, we’re going to be looking at some of the most important features and putting it toe-to-toe with some of the biggest names in small electronics.
We’ll be showing you what the Pico can do, and we’ll get you started with MicroPython, one of Pico’s supported programming languages. We’ll even offer up some code to try in case you decide to buy a Pico of your own.
What Is a Raspberry Pi Pico?
Raspberry Pi Pico is a new budget microcontroller designed by Raspberry Pi. It’s a tiny computer built around a single chip, with onboard memory, and programmable in/out ports. Historically, microcontrollers are used in a variety of devices from medical implants to power tools. If you have an electronic device sitting in your vicinity, there’s a good chance that there’s a microcontroller inside of it.
Key Features of the Pico

The Pico is built around the RP2040 microcontroller chip, which was designed by Raspberry Pi UK. It’s a Dual-Core ARM processor with a flexible clock that can run up to 133 MHz. The Pico also supports 1.8-5.5 DC input voltage, has a micro-USB input port, and an onboard temperature sensor.
Flanking the chip on all sides are a series of castellations that allow easy soldering to a Veroboard or breadboard. This dual in-line package (DIP) style form factor is stackable, and can also be used in carrier board applications.
Technical Specifications
21 mm x 51 mm
264kb on-chip RAM
2 MB on-board QSPI flash
2 UART
26 GPIO
2 SPI controllers
2 ISC controllers
16 PWM channels
Accelerated integer and floating-point libraries
3-pin ARM Serial Wire Debug (SWD) port
What’s So Special About the Pi Pico?
The Pi Pico is a different kind of microcontroller. It’s Raspberry Pi’s first, and it features ARM technology in its RP2040 silicon chip. Many technology companies are embracing silicon ARM chips, with major manufacturers like Apple leading the charge.
The punchy little Pico packs a staggering 26 multifunction general purpose input/output (GPIO) ports, including 3 that are analog. Alongside these ports are 8 programmable input/output (PIO) ports. Compare this to other microcontrollers like the Arduino Nano, and the Pico packs roughly 18% more GPIO capability.
The most considerable difference between the Pico and its competitors, however, is the $4 price tag. Low cost is the main selling point of this unique offering.
At launch, many online retailers sold out of the device due to the interest and Raspberry Pi’s favorable reputation. By setting the price so low, the Pico opens the door for a new class of high-powered, budget microcontrollers.
There are many potential applications for the new Pico. With its onboard temperature sensor, the device is an obvious choice for IoT projects.
One talented retro gaming enthusiast even used a Pico to build a gaming console with full VGA video support.
youtube
This means that makers who have been curious about Raspberry Pi, or microcontrollers in general, now have the ability to experiment for less than the price of a fancy cup of coffee.
Related: The Raspberry Pi Comes of Age With the Pi 400 Desktop
The Raspberry Pi Pico Processor
The RP2040 ARM chip is an interesting choice for the Pico. At 133MHz, the chip is capable of leaving more expensive boards, like the Arduino Uno, in the dust.
Using ARM processors seems to be an emerging trend in the world of microcontrollers. In addition to Raspberry Pi, both Sparkfun and Adafruit also offer boards with similar ARM technology.
The industry-wide switch was made for a single reason—speed. ARM processors give a considerable boost over standard Atmel chips. In a board this size, using an ARM processor is like dropping a fully kitted Porsche engine into a Volkswagen. On the other hand, many microcontrollers don’t require that much processing speed. Yet.
Ramping up performance means that makers who want to push the limits of the Pico will have an abundance of power to do so.
The I/O Ports
The GPIO ports on the Pi Pico feature several interesting functions for common uses such as operating a screen, running lighting, or incorporating servos/relays. Some functions of the GPIO are available on all ports, and some only work for specific uses. GPIO 25, for example, controls the Pico’s onboard LED, and GPIO 23 controls the onboard SMPS Power Save feature.
The Pico also has both VSYS (1.8V — 5.5V) and VBUS (5V when connected to USB) ports, which are designed to deliver current to the RP2040 and its GPIO. This means that powering the Pico can be done with or without the use of the onboard micro-USB.
A full list of the I/O ports is available on Raspberry Pi’s website in its complete Pico documentation.
Pico vs. Arduino vs. Others
One question on the minds of many makers is whether or not the Raspberry Pi Pico is better than Arduino?
That depends. Pound-for-pound, higher-end Arduino boards like the Portenta H7 make the Pico look like a toy. However, the steep cost for a board of that caliber might be a tough pill for the microcontroller hobbyist to swallow. That's why the smaller price tag on the Pico makes it a win for makers who enjoy low-risk experimentation.
Along with minimal cost, the Raspberry Pi jams an extensive feature set into the Pico, comparable to boards like the Teensy LC, and the ESP32. But neither of these competitors manage to challenge the budget-friendly Pico on price.
That's what makes the Pico such a fantastic value, and a great choice for hobbyists and power users alike.
The Pi Pico: What’s Not To Love?
Unfortunately, to drive the price of the Pico down, Raspberry Pi had to make a few compromises. The most notable of which is the lack of an onboard radio module. Neither Bluetooth nor Wi-Fi is supported without add-ons.
The Wi-Fi limitation can be eliminated by adding a module like the ESP-01. Bluetooth support may prove a bit more challenging. If you need an all-in-one solution for your products, you’re better off skipping the Pico, and spending a little extra for something like the Pi Zero W, or ESP32.
Additionally, many early adopters are complaining about the lack of GPIO labeling on the top of the board. Raspberry Pi provides an extensive amount of documentation on its website to address this, but pointing-and-clicking, or thumbing through paperwork when you have a hot soldering iron in your hands isn’t often desirable.
Lastly, the lack of I/O pin headers is something of an issue for some, as it means less convenience when swapping I/O components. This minor annoyance can be solved via the use of leads, soldering the component wiring directly to the Pico, or using a breadboard.
If you’ve been using microcontrollers or small electronics for any period of time, then an unpopulated board is most likely a non-issue. Of course, you could also add your own pin headers if you plan on regular experimentation with different external components.
The final rub with the Pico is the micro-USB port. With many other microcontrollers like the Portenta H7 moving toward USB-C, Raspberry Pi's micro-USB port seems dated.
Logically however, the decision to use micro-USB makes sense. It was done by Raspberry Pi to keep costs as low as possible, and to keep interface capability almost universal. Everyone we know has at least a few micro-USB cables tucked away somewhere in their homes.
However, with future versions, a USB-C interface would be a nice addition to an already spectacular package.
Related: A Beginners Guide To Breadboarding With Raspberry Pi
Programming the Raspberry Pi Pico
Interfacing with the Pi Pico can be done via C/C++, or via MicroPython in the Read-Eval-Print-Loop or REPL (pronounced “Reh-pul”). The REPL is essentially a command line interface that runs line-by-line code in a loop.
In order to access the REPL, you’ll need to install MicroPython onto the Pico. This process is simple and only involves four steps.
Installing MicroPython
Download MicroPython for Raspberry Pi Pico from the Raspberry Pi Website
Connect the Pico to your computer via micro-USB while holding the BOOTSEL button
Wait for the Pico to appear as an external drive
Copy the MicroPython file to the Pi Pico, and it will automatically reboot
You can access the REPL in a number of ways. We used the screen command in a macOS terminal window to access the serial bus connected to the Pico. To accomplish this with Terminal, you’ll first open a new terminal window, then type ls /dev/tty*
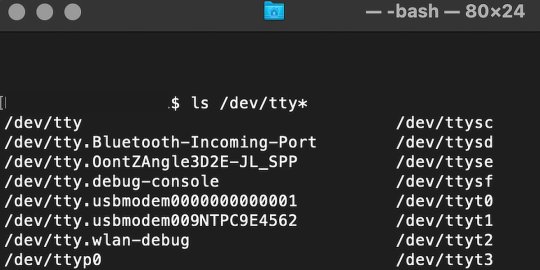
From there, find the port where the Pico is connected. It should be labeled something like /dev/tty.usbmodem0000000000001. Then run the command:
screen /dev/tty.usbmodem0000000000001
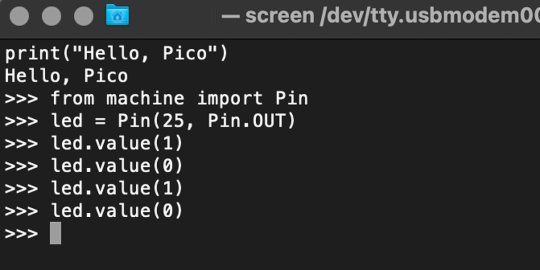
Your cursor should change. Hit Return and the cursor will change again to >>>.
In the image below we've included the classic Hello World (Hello, Pico) command-line program in the REPL, along with a few lines of code that will turn the Pico's LED on and off. Feel free to try them yourself.
For more information, we recommend you invest in the official starter guide to MicroPython that Raspberry Pi has published on their website.
Download: MicroPython for Raspberry Pi Pico (free)
Using the Raspberry Pi Pico With Thonny
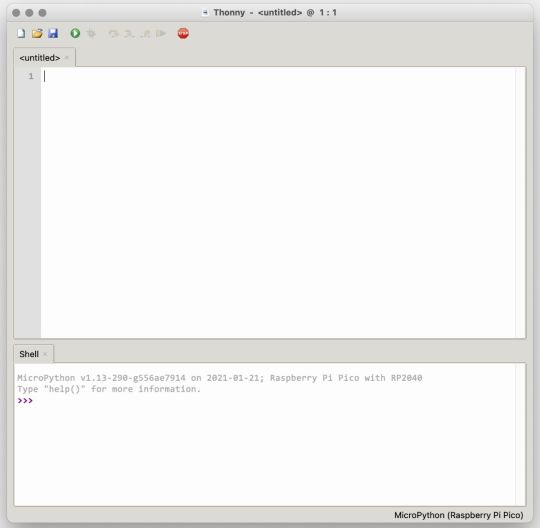
If you’re looking for a more proper coding environment, the Raspberry Pi Pico will also allow access to the REPL with Thonny. To enable this feature, first download and install Thonny. Once installed, connect your Pi Pico. Open Thonny and you'll see information indicating your Pico is connected in the Shell.
At the bottom right of the screen, you should see a version of Python. Click this version and select MicroPython (Raspberry Pi Pico) from the drop-down menu.
Now you can type commands into the Shell, or you can use Thonny’s editor to write or import multiple lines of code.
The abundance of interface possibilities make the Raspberry Pi Pico easy to program. For those who are familiar with MicroPython, this should be nothing new. For beginners, however, Thonny provides a powerful interface and debugger to get started with programming.
Download: Thonny (Free) Windows | Mac
Should I Buy the Raspberry Pi Pico?
The Raspberry Pi Pico is a powerful budget board that is perfect for hobbyists, or makers just starting out with microcontrollers. The documentation, low cost, and wide range of possibilities for the Pico also make it a great choice for seasoned small electronics wizards. If you’re a DIYer who loves to tinker, or you just want to challenge yourself to a weekend project, then you’ll love playing with the Pico.
On the other hand, if you don't have one or more projects in mind that need a microcontroller, then this board is probably not for you. Also, if your project needs Wi-Fi connectivity or Bluetooth, then the Pico won’t scratch that itch. And finally, for users who aren’t comfortable learning MicroPython, or exploring C/C++, the Pico isn't ideal. And remember: this Raspberry Pi is not like the others. It will not run a full Linux operating system.
But, if you dream in Python, or if you love the smell of solder, then you won't regret grabbing this tiny powerhouse. Most of all, if the sight of the sports-car-sleek RP2040 gets your creative gears turning, then we think you’ll really benefit from picking up the Pico.
Serving up Several Sweet Possibilities
While it isn’t perfect, the Raspberry Pi Pico is a strong entry into the world of microcontrollers. The reputation that Raspberry Pi has built for quality electronic components at a relatively low price extends to the Pico.
It’s everything a Raspberry Pi should be: small, sweet, and superb. It’s beautifully designed, and extremely inexpensive. But the best part isn’t the looks or the low cost.
The best part about this small wonder is picking it up, and holding it in your hands. It's feeling the tug of electronic inspiration. It's realizing just how powerful the Pico is, and what it means for microcontrollers going forward.
And truthfully, we think it's amazing that something as small as the Pico can offer so many unique possibilities.
A Peek at the Pico, Raspberry Pi's Newest Petite Powerhouse published first on http://droneseco.tumblr.com/
0 notes
Text
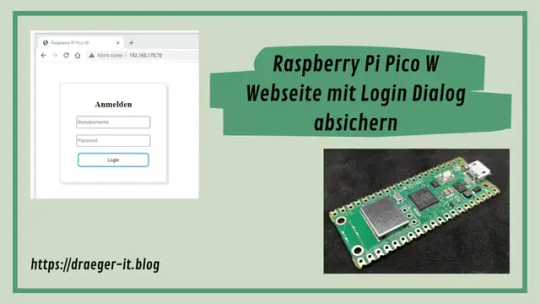
Raspberry Pi Pico W - Webseite mit Login absichern

In diesem Beitrag möchte ich dir zeigen, wie du eine Webseite auf dem Raspberry Pi Pico W mit einem Login Dialog absichern kannst.
Wie du eine Webseite auf dem Raspberry Pi Pico W programmierst und veröffentlichst, habe ich dir bereits im Beitrag Raspberry Pi Pico W – Webseite ins Internet veröffentlichen erläutert.
Programmieren einer kleinen Seite mit einem Login Dialog
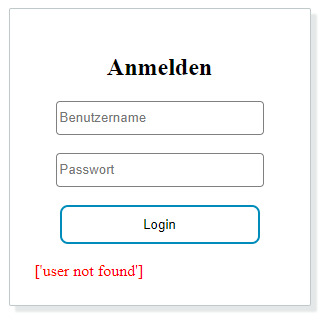
Erstellen wir zunächst eine kleine Webseite mit den Feldern für Benutzername & Passwort und einer Schaltfläche "Login".

Login Dialog für den Raspberry Pi Pico W Das Styling in CSS und die JavaScript-Dateien lege ich auf einem Server ab: - http://progs.ressourcen-draeger-it.de/raspberrypipicow/login/css/style.css - http://progs.ressourcen-draeger-it.de/raspberrypipicow/login/js/jquery-3.6.3.min.js - http://progs.ressourcen-draeger-it.de/raspberrypipicow/login/js/functions.js Die Webseite schreibe ich zunächst in einem normalen Texteditor wie dem Notepad++. Das macht das Testen der Seite deutlich einfacher, da man nicht immer das Programm neu auf den Mikrocontroller schreiben muss. Da wir später den HTML-Code in eine Variable im MicroPython-Code ablegen wollen, dürfen wir innerhalb des Codes nur die doppelten Anführungszeichen verwenden! Wenn der HTML-Code fertig ist, dann muss dieser noch mit einem Tool komprimiert werden, dazu werden die unnötigen Leerzeilen & Zeilenumbrüche entfernt, hier nutze ich TextFixer. Nachfolgend nun die kleine Seite mit dem formatierten Login Dialog für den Raspberry Pi Pico W. Die Felder "{serverIP}" & "{messages}" werden später im MicroPyton-Code durch die IP-Adresse des Mikrocontrollers bzw. der Meldungen ersetzt. Raspberry Pi Pico W
Anmelden
{messages} Wenn wir diesen HTML-Code nun mit TextFixer komprimieren, erhalten wir folgende reduzierten Text: Raspberry Pi Pico W
Anmelden
JavaScript Funktion zum Absenden der Formulardaten Wenn der Benutzer die Schaltfläche "Login" betätigt, wird eine JavaScript-Funktion ausgeführt. Hier nutzte ich wieder jQuery dieses JavaScript Framework ist sehr leichtgewichtig und vor allem sehr gut Dokumentiert. Wenn die Seite fertig geladen ist, dann binden wir an den Login Button die Funktion "click" welche wiederum die Daten aus den Feldern "inpUsername" & "inpPassword" entnimmt und diese wiederum zu einer Adresszeile zusammenfügt. $( document ).ready(function() { $('#loginBtn').on( "click", function() { var username = $("#inpUsername").val(); var password = $("#inpPassword").val(); window.open("http://"+serverIp+"?username="+username+"&password="+password,'_self'); }); }); Hier finden wir auch wieder unser Feld "serverIp" selcher im HTML-Code als JavaScript Block eingefügt wurde. Styling per CSS Das Styling des Dialoges habe ich in einer separaten CSS Datei abgelegt, dieses hält den eigentlichen HTML-Code sehr schlank und belegt nicht zusätzlich Speicher auf dem Mikrocontroller. h2{text-align:center;} input{border-radius: 4px;border: 1px solid gray;height: 26px;padding: 3px;} input:focus{background-color:#FEF9E7;outline: none !important;border: 1px solid gray;} input{transition-duration: 0.4s;border-radius: 8px;padding: 10px 24px; background-color: white; color: black; border: 2px solid #008CBA;} input:hover {background-color: #008CBA; color: white;} input, input{width:200px} label{display: inline-block;width: 95px;text-align: right;padding-right: 10px;} .outer{width:250px;margin:0px auto;border:1px solid #BFC9CA;padding:25px;box-shadow: #E5E8E8 6px 6px 2px; margin-top: 60px;border-radius:2px;} .messages{color:red;}
Programmieren in MicroPython auf dem Pi Pico W
Da wir das Frontend soeben fertiggestellt haben, müssen wir das passende Backend entwickeln. Gerne möchte ich dir hier meine Lösung präsentieren. Die Werte für Benutzername & Passwort werden als GET Parameter an die URL gehängt, dies ist ein kleines Sicherheitsrisiko da jeder dieses Passwort lesen kann. Exkurs - Aufbau einer WLAN-Verbindung am Pi Pico W Schauen wir uns zunächst einmal kurz an wie man eine WLAN-Verbindung am Pi Pico W aufbaut. Den nachfolgenden Code habe ich bereits im Beitrag Raspberry Pi Pico W – Webseite ins Internet veröffentlichen vorgestellt und erläutert. Jedoch dient dieser als Ausgangsbasis für unser Login Dialog. import network import socket import time from machine import Pin ssid = '***' password = '****' wlan = network.WLAN(network.STA_IF) wlan.active(True) wlan.connect(ssid, password) html = 'Raspberry Pi Pico W
Hello World!
' print('waiting for connection...') max_wait = 10 while max_wait > 0: if wlan.status() < 0 or wlan.status() >= 3: break max_wait -= 1 print('.', end='') time.sleep(1) print('') if wlan.status() != 3: raise RuntimeError('network connection failed') else: print('connected') status = wlan.ifconfig() print('ip = ' + status) addr = socket.getaddrinfo('0.0.0.0', 80) s = socket.socket() s.bind(addr) s.listen(1) print('listening on', addr) while True: try: cl, addr = s.accept() print('client connected from', addr) cl.send('HTTP/1.0 200 OKrnContent-type: text/htmlrnrn') cl.send(html) cl.close() except OSError as e: cl.close() print('connection closed')
Login Dialog einbauen
Zunächst legen wir ein Feld für den HTML-Code unserer Seiten an. Zum einen für den Login Dialog und eine Seite, wenn der Benutzer erfolgreich eingeloggt wurde. htmlPage = 'Raspberry Pi Pico W
Anmelden
{messages}' loggedInPage = "Raspberry Pi Pico W
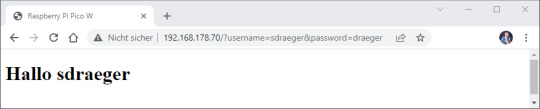
Hallo {username}
" Dictionary mit Benutzern Die Benutzer speichern wir in einem Dictionary, wobei der Key der Benutzername ist. users = { "sdraeger": { "password":"draeger" }, "mmustermann": { "password":"mustermann" } } Auslesen der GET Parameter Wenn wir die Schaltfläche Login betätigen, dann wird der HTTP-Request zusammengebaut mit den Benutzername & Passwort aus den entsprechenden Feldern. Diese Werte finden wir in unserem Code wieder, wenn wir uns das Request Objekt ausgeben: cl, addr = s.accept() print('client connected from', addr) request = cl.recv(1024) request = str(request) print(request) Diesen Text können wir nun parsen und die Werte entnehmen. b'GET /?username=sdraeger&password=draeger HTTP/1.1rnHost: Parsen des Requests Wie man erkennt, beginnen die Parameter am Index 8 und enden mit " HTTP". Hier können wir recht einfach mit Python Logik an diesen Substring gelangen. Dann prüfen wir, ob die Schlüsselwörter "username" und "password" darin enthalten sind. Wenn dieses nicht der Fall ist, soll der Login Dialog ausgeliefert werden. params = request if "username" in params and "password" in params: values = params.split("&") username = values.split("=") password = values.split("=") Wenn diese Schlüsselwörter enthalten sind, werden die Werte geparst. Im nächsten Schritt muss nun geprüft werden ob der Benutzername als Key im Dictionary "users" hinterlegt ist. if username in users: messages.append("user found") Wenn der Benutzername hinterlegt wurde, dann wird eine Message gespeichert und das Passwort geprüft. Wenn wiederum das Passwort korrekt ist, dann wird die Variable "loginOK" auf True gesetzt andernfalls verbleibt diese auf False. if users ==password: messages.append("login OK") loginOk = True else: messages.append("login fail")
Auswerten des Login Prozesses und ausliefern der Seite
Wenn die Werte geprüft wurden, dann soll eine entsprechende Seite ausgeliefert werden. if loginOk: cl.send(loggedInPage.format(username=username)) else: if messages: loginMessages = messages else: loginMessages = "" cl.send(htmlPage.format(serverIp=serverIpAdress, messages=loginMessages)) In meinem Fall zeige ich dem angemeldeten Benutzer lediglich eine kleine Seite mit einer Begrüßung an.
Wenn der Login nicht erfolgreich war, dann wir im Dialog eine entsprechende Meldung ausgegeben.
fertiger MicroPython-Code
Hier nun der komplette MicroPython-Code zum einfachen Download als ZIP-Datei oder zum kopieren. Pi Pico W - Login DialogHerunterladen import network import socket import time from machine import Pin ssid = '***' password = '***' users = { "sdraeger": { "password":"draeger" }, "mmustermann": { "password":"mustermann" } } htmlPage = 'Raspberry Pi Pico W
Anmelden
{messages}' loggedInPage = "Raspberry Pi Pico W
Hallo {username}
" wlan = network.WLAN(network.STA_IF) wlan.active(True) wlan.connect(ssid, password) html = 'Raspberry Pi Pico W
Hello World!
' print('waiting for connection...') max_wait = 10 while max_wait > 0: if wlan.status() < 0 or wlan.status() >= 3: break max_wait -= 1 print('.', end='') time.sleep(1) print('') if wlan.status() != 3: raise RuntimeError('network connection failed') else: print('connected') status = wlan.ifconfig() print('ip = ' + status) addr = socket.getaddrinfo('0.0.0.0', 80) s = socket.socket() s.bind(addr) s.listen(1) print('listening on', addr) while True: try: cl, addr = s.accept() print('client connected from', addr) request = cl.recv(1024) request = str(request) print(request) params = request serverIpAdress = status messages = loginOk = False cl.send('HTTP/1.0 200 OKrnContent-type: text/htmlrnrn') if "username" in params and "password" in params: values = params.split("&") username = values.split("=") password = values.split("=") if username in users: messages.append("user found") if users ==password: messages.append("login OK") loginOk = True else: messages.append("login fail") else: messages.append("user not found") if loginOk: cl.send(loggedInPage.format(username=username)) else: if messages: loginMessages = messages else: loginMessages = "" cl.send(htmlPage.format(serverIp=serverIpAdress, messages=loginMessages)) cl.close() except OSError as e: cl.close() print('connection closed') Read the full article
0 notes
Text
0 notes
Text
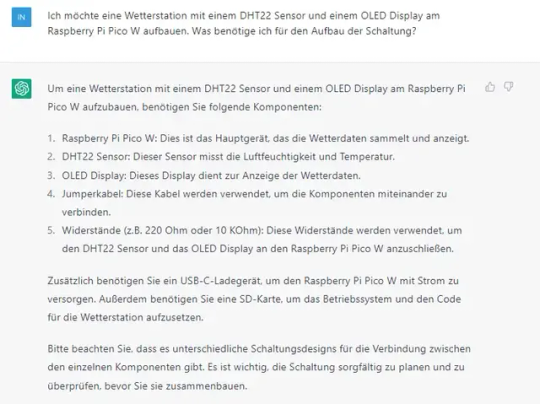
Raspberry Pi Pico W - programmieren einer Wetterstation mit ChatGPT

In diesem Beitrag möchte ich dir zeigen, wie du eine Wetterstation am Raspberry Pi Pico W mit der Hilfe von ChatGPT programmieren kannst.
Zum Raspberry Pi Pico W habe ich dir bereits einige Beiträge verfasst und eine Wetterstation habe ich dir ebenfalls bereits mit dem Arduino & ESP32 gezeigt. Hier soll es nun darum gehen, wie die Daten eines DHT22 Sensors auf einem OLED-Display angezeigt werden. Dieses kann man sich sehr einfach zu Recht googeln und hätte auch sehr wahrscheinlich innerhalb weniger Sekunden einen fertigen Beitrag gefunden, wo man den Code 1:1 kopieren könnte. Jedoch möchte ich ebenfalls probieren, ob ChatGPT in der Lage ist ein Entwickler zu unterstützen. Im nachfolgenden YouTube-Video erläutere ich dir ausführlich, wie du die Schaltung aufbaust und dabei ChatGPT nutzen kannst. https://youtu.be/xeMgLC2KiYw
Aufbau der Schaltung
Fangen wir zunächst an und bauen die Schaltung auf. Dazu müssen wir ermitteln, welche Bauteile / Komponenten wir benötigen.
Die nächste Frage wäre nun, wie man diese Komponenten miteinander verbindet. Das Problem war hier, dass die Antwort von ChatGPT falsch war und die falschen Pins für SDA & SCL benannt wurden. Aber nach einer kurzen Erläuterung meinerseits im Chat wurde eine korrekte Tabelle mit den Anschlüssen ausgegeben.
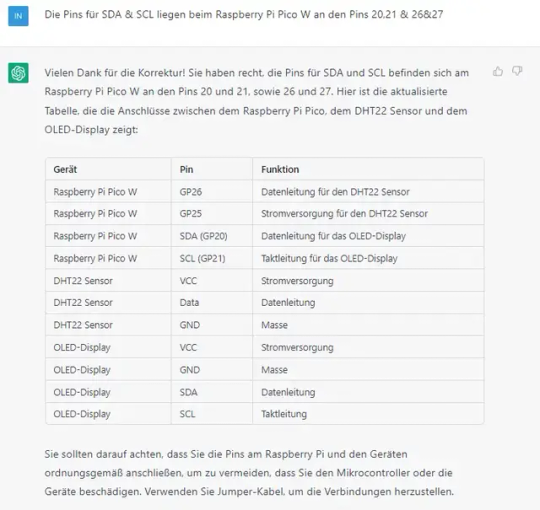
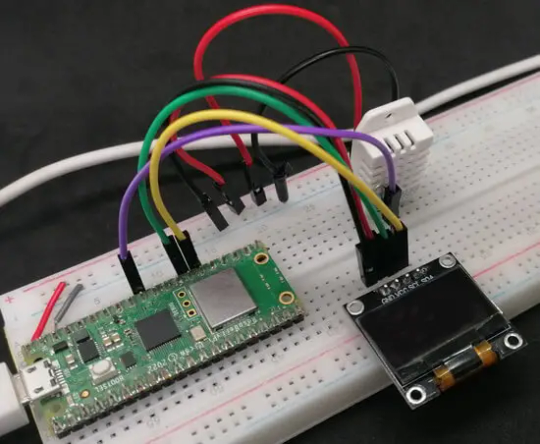
Wenn wir die Komponenten wie in der Tabelle beschrieben angeschlossen haben, dann sollte die Schaltung wie folgt aussehen.
Flashen des Raspberry Pi Pico W
Zunächst flashen wir den Raspberry Pi Pico W mit dem aktuellen Flash-File von https://www.raspberrypi.com/documentation/microcontrollers/micropython.html. Auf der genannten Seite bekommst du die beiden UF2-Dateien für das Model, mit und ohne WiFi Support, je nach Model musst du die eine oder andere Datei wählen! Die heruntergeladene UF2-Datei wird per Drag'n Drop auf den Mikrocontroller kopiert, dazu muss dieser jedoch in einem speziellen Modus gestartet werden. Auf dem Mikroconroller Raspberry Pi Pico W befindet sich ein Taster welcher mit "BOOTSEL" beschriftet ist, dieser wird gedrückt gehalten und dann der Mikrocontroller mit dem Computer verbunden wird. Wenn der Mikrocontroller dann erkannt und das Laufwerk eingebunden wurde, kann dieser Taster losgelassen werden.
Code für den Sensor und das OLED-Display erzeugen lassen
Wenn wir nun die Schaltung aufgebaut haben, benötigen wir noch den Code zum DHT22 Sensor und zum OLED-Display. Mit der nachfolgenden Anfrage erhalte ich den Code für diese Komponenten.

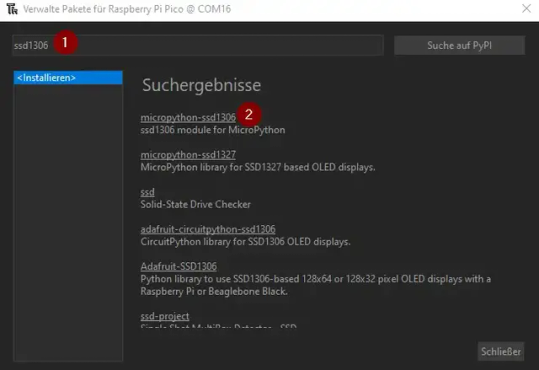
Die Schlüsselwörter sind hier unter anderem "Micropython" & "Raspberry Pi Pico W". Wenn wir einen anderen Mikrocontroller verwenden würden oder eine andere Sprache, dann müssten wir dieses hier logischerweise entsprechend anpassen. Code für den DHT22 Sensor Für den DHT22 Sensor benötigen wir keine zusätzliche Bibliothek, diese ist bereits in Micropython enthalten. Der nachfolgende Code erzeugt auf der Console die Ausgabe von der Temperatur sowie für die rel. Luftfeuchtigkeit. import machine import dht d = dht.DHT22(machine.Pin(26)) d.measure() temperature = d.temperature() humidity = d.humidity() print("Temperature: ", temperature) print("Humidity: ", humidity) Code für das OLED-Display Für die Ausführung / Kompilierung des Codes benötigen wir zusätzlich noch eine Bibliothek. Diese können wir in der Thonny IDE installieren, in dem über Extras > Verwaltete Pakete... navigieren und dort nach "ssd1306" (1) suchen. In den Suchergebnissen wählen wir den ersten Punkt "micropython-ssd1306" (2) und im nächsten Dialog die Schaltfläche "Installieren". Wenn der Vorgang abgeschlossen ist, dann können wir den Dialog über die Schaltfläche "Schließen" (4) verlassen.

Nachdem die Bibliothek erfolgreich installiert wurde, kann der nachfolgende Code auf dem Mikrocontroller ausgeführt werden. import machine import ssd1306 i2c = machine.I2C(0, scl=machine.Pin(21), sda=machine.Pin(20)) display = ssd1306.SSD1306_I2C(128, 64, i2c) display.fill(0) display.text("Temperature: ", 0, 0) display.text(str(temperature), 0, 10) display.text("Humidity: ", 0, 20) display.text(str(humidity), 0, 30) display.show()
Kumulierter Code von ChatGPT für die Wetterstation am Raspberry Pi Pico W
Wenn wir nun die beiden Codestücke zusammenfügen, dann ergibt dieser nachfolgender Code: import machine import ssd1306 import dht from time import sleep d = dht.DHT22(machine.Pin(26)) i2c = machine.I2C(0,scl=machine.Pin(21), sda=machine.Pin(20)) display = ssd1306.SSD1306_I2C(128, 64, i2c) while True: d.measure() temperature = d.temperature() humidity = d.humidity() display.fill(0) display.text("Temperature: ", 0, 0) display.text(str(temperature)+"C", 20, 10) display.text("Humidity: ", 0, 25) display.text(str(humidity)+"%", 20, 35) display.show() sleep(5) Wenn der obige Code auf dem Raspberry Pi Pico W ausgeführt wird, dann erhalten wir die Daten für die Temperatur sowie für die relative Luftfeuchtigkeit.
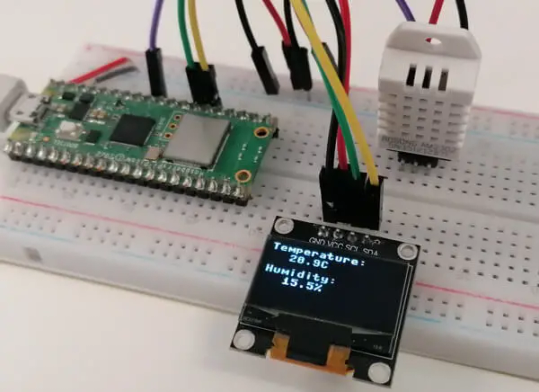
fertige Schaltung mit ausgeführten Code für die Wetterstation Read the full article
0 notes
Text
A Peek at the Pico, Raspberry Pi's Newest Petite Powerhouse
Raspberry Pi Pico
8.80 / 10
Read Reviews
Read More Reviews
Read More Reviews
Read More Reviews
Read More Reviews
Read More Reviews

Shop Now
Meet the new Raspberry Pi Pico; a tiny microcontroller filled with big possibilities.
Specifications
Brand: Raspberry Pi
CPU: Dual-core 133Mhz ARM
Memory: 264Kb
Ports: microUSB
Pros
Powerful ARM Processor
Micro-USB Connectivity
Breadboard Mountable
Easy-To-Use Interface
Absolutely Adorable
Inexpensive
Cons
No Wi-Fi or Bluetooth connectivity
No Header Pins
I/O Port Labelling on One Side Only
No USB-C Connectivity
Buy This Product
Raspberry Pi Pico other
Shop
// Bottom var galleryThumbs1 = new Swiper('.gallery-thumbs-1', { spaceBetween: 10, slidesPerView: 10, freeMode: true, watchSlidesVisibility: true, watchSlidesProgress: true, centerInsufficientSlides: true, allowTouchMove: false, preventClicks: false, breakpoints: { 1024: { slidesPerView: 6, } }, }); // Top var galleryTop1 = new Swiper('.gallery-top-1', { spaceBetween: 10, allowTouchMove: false, loop: true, preventClicks: false, breakpoints: { 1024: { allowTouchMove: true, } }, navigation: { nextEl: '.swiper-button-next', prevEl: '.swiper-button-prev', }, thumbs: { swiper: galleryThumbs1 } });
We’ve managed to get our hands on the coveted Raspberry Pi Pico. Today, we’re going to be looking at some of the most important features and putting it toe-to-toe with some of the biggest names in small electronics.
We’ll be showing you what the Pico can do, and we’ll get you started with MicroPython, one of Pico’s supported programming languages. We’ll even offer up some code to try in case you decide to buy a Pico of your own.
What Is a Raspberry Pi Pico?
Raspberry Pi Pico is a new budget microcontroller designed by Raspberry Pi. It’s a tiny computer built around a single chip, with onboard memory, and programmable in/out ports. Historically, microcontrollers are used in a variety of devices from medical implants to power tools. If you have an electronic device sitting in your vicinity, there’s a good chance that there’s a microcontroller inside of it.
Key Features of the Pico
The Pico is built around the RP2040 microcontroller chip, which was designed by Raspberry Pi UK. It’s a Dual-Core ARM processor with a flexible clock that can run up to 133 MHz. The Pico also supports 1.8-5.5 DC input voltage, has a micro-USB input port, and an onboard temperature sensor.
Flanking the chip on all sides are a series of castellations that allow easy soldering to a Veroboard or breadboard. This dual in-line package (DIP) style form factor is stackable, and can also be used in carrier board applications.
Technical Specifications
21 mm x 51 mm
264kb on-chip RAM
2 MB on-board QSPI flash
2 UART
26 GPIO
2 SPI controllers
2 ISC controllers
16 PWM channels
Accelerated integer and floating-point libraries
3-pin ARM Serial Wire Debug (SWD) port
What’s So Special About the Pi Pico?
The Pi Pico is a different kind of microcontroller. It’s Raspberry Pi’s first, and it features ARM technology in its RP2040 silicon chip. Many technology companies are embracing silicon ARM chips, with major manufacturers like Apple leading the charge.
The punchy little Pico packs a staggering 26 multifunction general purpose input/output (GPIO) ports, including 3 that are analog. Alongside these ports are 8 programmable input/output (PIO) ports. Compare this to other microcontrollers like the Arduino Nano, and the Pico packs roughly 18% more GPIO capability.
The most considerable difference between the Pico and its competitors, however, is the $4 price tag. Low cost is the main selling point of this unique offering.
At launch, many online retailers sold out of the device due to the interest and Raspberry Pi’s favorable reputation. By setting the price so low, the Pico opens the door for a new class of high-powered, budget microcontrollers.
There are many potential applications for the new Pico. With its onboard temperature sensor, the device is an obvious choice for IoT projects.
One talented retro gaming enthusiast even used a Pico to build a gaming console with full VGA video support.
youtube
This means that makers who have been curious about Raspberry Pi, or microcontrollers in general, now have the ability to experiment for less than the price of a fancy cup of coffee.
Related: The Raspberry Pi Comes of Age With the Pi 400 Desktop
The Raspberry Pi Pico Processor
The RP2040 ARM chip is an interesting choice for the Pico. At 133MHz, the chip is capable of leaving more expensive boards, like the Arduino Uno, in the dust.
Using ARM processors seems to be an emerging trend in the world of microcontrollers. In addition to Raspberry Pi, both Sparkfun and Adafruit also offer boards with similar ARM technology.
The industry-wide switch was made for a single reason—speed. ARM processors give a considerable boost over standard Atmel chips. In a board this size, using an ARM processor is like dropping a fully kitted Porsche engine into a Volkswagen. On the other hand, many microcontrollers don’t require that much processing speed. Yet.
Ramping up performance means that makers who want to push the limits of the Pico will have an abundance of power to do so.
The I/O Ports
The GPIO ports on the Pi Pico feature several interesting functions for common uses such as operating a screen, running lighting, or incorporating servos/relays. Some functions of the GPIO are available on all ports, and some only work for specific uses. GPIO 25, for example, controls the Pico’s onboard LED, and GPIO 23 controls the onboard SMPS Power Save feature.
The Pico also has both VSYS (1.8V — 5.5V) and VBUS (5V when connected to USB) ports, which are designed to deliver current to the RP2040 and its GPIO. This means that powering the Pico can be done with or without the use of the onboard micro-USB.
A full list of the I/O ports is available on Raspberry Pi’s website in its complete Pico documentation.
Pico vs. Arduino vs. Others

One question on the minds of many makers is whether or not the Raspberry Pi Pico is better than Arduino?
That depends. Pound-for-pound, higher-end Arduino boards like the Portenta H7 make the Pico look like a toy. However, the steep cost for a board of that caliber might be a tough pill for the microcontroller hobbyist to swallow. That's why the smaller price tag on the Pico makes it a win for makers who enjoy low-risk experimentation.
Along with minimal cost, the Raspberry Pi jams an extensive feature set into the Pico, comparable to boards like the Teensy LC, and the ESP32. But neither of these competitors manage to challenge the budget-friendly Pico on price.
That's what makes the Pico such a fantastic value, and a great choice for hobbyists and power users alike.
The Pi Pico: What’s Not To Love?
Unfortunately, to drive the price of the Pico down, Raspberry Pi had to make a few compromises. The most notable of which is the lack of an onboard radio module. Neither Bluetooth nor Wi-Fi is supported without add-ons.
The Wi-Fi limitation can be eliminated by adding a module like the ESP-01. Bluetooth support may prove a bit more challenging. If you need an all-in-one solution for your products, you’re better off skipping the Pico, and spending a little extra for something like the Pi Zero W, or ESP32.
Additionally, many early adopters are complaining about the lack of GPIO labeling on the top of the board. Raspberry Pi provides an extensive amount of documentation on its website to address this, but pointing-and-clicking, or thumbing through paperwork when you have a hot soldering iron in your hands isn’t often desirable.
Lastly, the lack of I/O pin headers is something of an issue for some, as it means less convenience when swapping I/O components. This minor annoyance can be solved via the use of leads, soldering the component wiring directly to the Pico, or using a breadboard.
If you’ve been using microcontrollers or small electronics for any period of time, then an unpopulated board is most likely a non-issue. Of course, you could also add your own pin headers if you plan on regular experimentation with different external components.
The final rub with the Pico is the micro-USB port. With many other microcontrollers like the Portenta H7 moving toward USB-C, Raspberry Pi's micro-USB port seems dated.
Logically however, the decision to use micro-USB makes sense. It was done by Raspberry Pi to keep costs as low as possible, and to keep interface capability almost universal. Everyone we know has at least a few micro-USB cables tucked away somewhere in their homes.
However, with future versions, a USB-C interface would be a nice addition to an already spectacular package.
Related: A Beginners Guide To Breadboarding With Raspberry Pi
Programming the Raspberry Pi Pico
Interfacing with the Pi Pico can be done via C/C++, or via MicroPython in the Read-Eval-Print-Loop or REPL (pronounced “Reh-pul”). The REPL is essentially a command line interface that runs line-by-line code in a loop.
In order to access the REPL, you’ll need to install MicroPython onto the Pico. This process is simple and only involves four steps.
Installing MicroPython
Download MicroPython for Raspberry Pi Pico from the Raspberry Pi Website
Connect the Pico to your computer via micro-USB while holding the BOOTSEL button
Wait for the Pico to appear as an external drive
Copy the MicroPython file to the Pi Pico, and it will automatically reboot
You can access the REPL in a number of ways. We used the screen command in a macOS terminal window to access the serial bus connected to the Pico. To accomplish this with Terminal, you’ll first open a new terminal window, then type ls /dev/tty*

From there, find the port where the Pico is connected. It should be labeled something like /dev/tty.usbmodem0000000000001. Then run the command:
screen /dev/tty.usbmodem0000000000001
Your cursor should change. Hit Return and the cursor will change again to >>>.
In the image below we've included the classic Hello World (Hello, Pico) command-line program in the REPL, along with a few lines of code that will turn the Pico's LED on and off. Feel free to try them yourself.

For more information, we recommend you invest in the official starter guide to MicroPython that Raspberry Pi has published on their website.
Download: MicroPython for Raspberry Pi Pico (free)
Using the Raspberry Pi Pico With Thonny

If you’re looking for a more proper coding environment, the Raspberry Pi Pico will also allow access to the REPL with Thonny. To enable this feature, first download and install Thonny. Once installed, connect your Pi Pico. Open Thonny and you'll see information indicating your Pico is connected in the Shell.
At the bottom right of the screen, you should see a version of Python. Click this version and select MicroPython (Raspberry Pi Pico) from the drop-down menu.
Now you can type commands into the Shell, or you can use Thonny’s editor to write or import multiple lines of code.
The abundance of interface possibilities make the Raspberry Pi Pico easy to program. For those who are familiar with MicroPython, this should be nothing new. For beginners, however, Thonny provides a powerful interface and debugger to get started with programming.
Download: Thonny (Free) Windows | Mac
Should I Buy the Raspberry Pi Pico?
The Raspberry Pi Pico is a powerful budget board that is perfect for hobbyists, or makers just starting out with microcontrollers. The documentation, low cost, and wide range of possibilities for the Pico also make it a great choice for seasoned small electronics wizards. If you’re a DIYer who loves to tinker, or you just want to challenge yourself to a weekend project, then you’ll love playing with the Pico.
On the other hand, if you don't have one or more projects in mind that need a microcontroller, then this board is probably not for you. Also, if your project needs Wi-Fi connectivity or Bluetooth, then the Pico won’t scratch that itch. And finally, for users who aren’t comfortable learning MicroPython, or exploring C/C++, the Pico isn't ideal. And remember: this Raspberry Pi is not like the others. It will not run a full Linux operating system.
But, if you dream in Python, or if you love the smell of solder, then you won't regret grabbing this tiny powerhouse. Most of all, if the sight of the sports-car-sleek RP2040 gets your creative gears turning, then we think you’ll really benefit from picking up the Pico.
Serving up Several Sweet Possibilities
While it isn’t perfect, the Raspberry Pi Pico is a strong entry into the world of microcontrollers. The reputation that Raspberry Pi has built for quality electronic components at a relatively low price extends to the Pico.
It’s everything a Raspberry Pi should be: small, sweet, and superb. It’s beautifully designed, and extremely inexpensive. But the best part isn’t the looks or the low cost.
The best part about this small wonder is picking it up, and holding it in your hands. It's feeling the tug of electronic inspiration. It's realizing just how powerful the Pico is, and what it means for microcontrollers going forward.
And truthfully, we think it's amazing that something as small as the Pico can offer so many unique possibilities.
A Peek at the Pico, Raspberry Pi's Newest Petite Powerhouse published first on http://droneseco.tumblr.com/
0 notes
Text
Find out how to get started with your Raspberry Pi Pico with Core Electronics video tutorials
Hi everyone. If, like me, you’re just starting out on your Raspberry Pi Pico journey, you’ll likely be looking for some resources to help you. This is a microcontroller, not a microcomputer, so you have to do things a bit differently. You’ve probably found the Getting Started guide over on raspberrypi.org which has all your documentation and get-up-and-going stuff. You might also (if you’ve…

View On WordPress
0 notes
Text
Can you use RISC OS as your main computer?
The short answer is yes, sort of, but mostly yes.
The RISC OS desktop on Raspberry Pi showing the 'pinboard' and 'iconbar'
In my post on using the BBC Micro as your main computer, we decided that for a computer to be of any use, it must be able to do the following well:
Connect to the Internet and have a fast, secure browser.
Provide applications for workflow.
Provide applications for playing media files.
We'll look at these in turn, but first some information about this Operating System. RISC OS was originally developed for the Acorn range of 32bit RISC computers in the late 1980s. That makes it older than 'Red Nose Day', GCSE examinations and the movie 'Die hard'. It was a time when plaid shirts were fashionable for men. If you turned on the radio you would suffer songs by Bros and Enya. Whereas you need not suffer Bros and plaid shirts anymore, RISC OS has continued to be developed to this day and is available for RISC architecture machines including the Raspberry Pi. In this post, I will be referring to RISC OS running on my Raspberry Pi 2. This operating system is an advanced GUI-based operating system although many of its features will appear strange or unexpected to a modern user who has, perhaps, become habitually used to Windows or Linux. Nevertheless, despite its quirks, RISC OS is a joy to use. But can it be your main computer? The Internet The Raspberry Pi does indeed connect to The Internet, however, RISC OS will only support wired ethernet connections. The onboard wireless adapter will not work here. Many of the applications for RISC OS are available through the online Pling store or the package manager. Some of these applications use network connections with little difficulty as you might expect from a modern OS. Sadly there are no applications for linking to your DropBox, OneDrive, Google or other cloud services. I use a second Raspberry Pi as a home file and web server and this serves files to the RISC Pi with ease. The default web browser is NetSurf which is a little underdeveloped. Most modern web pages fail to render properly. JavaScript does not run and you can forget about Flash, other plugins and all your favourite browser extensions. It is possible to install a version of Firefox, however, it requires several dependencies that I am repeated failing to install properly. After a few hours of trying I have finally given in, but I may return to that at a later date.
My Blog as shown in NetSurf
Workflow What your RISC machine can do here really depends on your workflow, however RISC OS is more capable than the BBC Micro so I shall cover some of the capabilities you might need. For word processing, spreadsheets, text files and database work, RISC OS has a number of applications that are free (as in free pizza) to download from the Pling Store (or indeed, might even be bundled with your software distribution). Most notable applications are Fireworkz, PipeDream and StrongEd. It is worth noting that I don't do much word processing on the RISC machine, and none of these applications beat the Microsoft Office 365 suite on my Windows machine. Nevertheless, all of these applications are capable enough of being your workhorse. Fireworkz can open Rich Text Format files, so if you need to open your world domination plan from MS-Word, you may need to do some editing or conversion first. Unless you are migrating thousands of files from Office 365 to RISC OS, you will find that your Raspberry Pi will be totally capable of most jobs here so I'm going to call it a 'pass'. It is worth mentioning that I use my RISC machine to take and keep various notes. This can easily be achieved as an OS task. Simply hit CTRL+F12 to bring up a task window and type: *build <filename> Press ESC to finish.
A demo of Fireworkz as a spreadsheet program
If your workflow includes image editing or audio editing, then there are a number of applications available for you here, although nothing to beat your professional applications on your modern PC. Also, don't expect your favourite open source applications (GIMP, Audacity etc) to be available under RISC OS. That said, your RISC machine will perform this kind of workflow well, so it's another 'pass'. It is highly likely that you will want to read a PDF document on your RISC machine. This is possible under the public domain PDF file viewer for RISC OS, however, I have noticed that it has failed to render some files that work perfectly well under Adobe and Edge on my Windows PC. Having said that, most documents have opened without problem on my Raspberry Pi, so we shall call this a 'pass'.
RISC OS PDF viewer showing a couple of PDF files displaying beautifully on my Raspberry Pi 2.
Media I will skip to the end. It is a surprising 'pass'. In fact, I use RISC OS primarily as a media machine. The NetRadio application is perfectly capable of handling your internet radio needs, as well as being able to play MP3 format files. I think I once wrote a post about how I threw my DAB digital radio over the side of my ship after installing RISC OS.
Net Radio, perfectly capable of catching the BBC 4 puzzle for the day over your cornflakes as it is playing your pirate metal songs in the evening.
As for video files. I have managed to get MPG format files to work perfectly. Other formats with some difficulty or not at all. My Pi
There are plenty of other applications available for RISC OS with many in active development. I generally have WeatherUK open at all times for my three-day forecast.
WeatherUK for your UK weather needs. Yes, it is snowing today, in March.
One of many useful apps for RISC OS
BASIC One of the best features of RISC OS is that the BBC BASIC language is built right into the operating system. Whether you want the system to learn to program, so you want to write applications to get the computer to do what you want it to do, then BASIC is a good option. Simply press F12 and type: BASIC To exit the BASIC terminal and return to your desktop, type: *DESKTOP I have already covered BBC BASIC in RISC OS in another post, so I won't go into details here. You can also install a version of RISC OS (Pico) which boots directly into the BASIC prompt without any of the graphical 'fluff' discussed so far in this post. Well, there it is. RISC OS will quite happily serve as a main computer based on the criteria we specified at the top of the page. If you haven't already explored it on your Raspberry Pi, then I thoroughly recommend it. You might find that you have other needs that I have not covered in this post, and you might also be equally surprised to discover that RISC OS has your back here as well. If you enjoyed this post, and even if you haven't, then you might like (or hate) to read some more RISC articles on this blog. Maybe you just want to write a sticky note and pin it to a virtual board on the internet? Maybe you just want to kill some orcs? via Blogger http://ift.tt/2G4aKdW http://ift.tt/2HLoMym
0 notes